LED照明-洗面所天井照明

今回で3台目のLED照明。今度は洗面所天井の照明。現在は、蛍光灯30W1灯で十分な明かりであるが、これも14~5年経っている。ここを電球色のLEDを使って改造することに。

電球色は、少し暗く感じるのと今回使用する3W×3個でさらに暗くなると思うが長時間つかうこともないし、慣れれば問題ないでしょう。

まずは基本設計。放熱や部品の配置を考慮。

基本設計

基本設計:basic design

LED取り付けの基板や放熱フィンを作成

取り付け基板

取り付け基板

完成基板

完成基板

完成基板

完成基板

まずは器具をはずし、不要なものを取り除く。

旧照明

旧照明

不要なものを取り外す

不要なものを取り外す

基板取り付けの穴を開け基板を取り付け、電源を取り付ける

基板を取り付け

基板を取り付け

配線をして完成

配線をして完成2

配線をして完成

天井に取り付けて完成。

完成

完成

予想したように少し暗い。このくらいは問題ない。不満が出ればLED追加で対応しよう。

LEDスタンドライト

IKEYAの机につけるスタンドを製作しました。

LEDは、シチズンの3W2個。放熱を考えセードと放熱にアルミを使い、切ったり削ったりあなを空けたり接着したり。

明るさは申し分ない。向きが変えられるように、セードにはノートPCの液晶パネルの根元にあるヒンジを再利用しアームの根元には、ラジオのアンテナの稼動部分を再利用して向きや方向を変えられるようにした。

前回製作した部屋の照明に使った1.6wのLEDは発熱が大きかったので今回は3wということで放熱フィンを大きくしたがこのLDEは放熱が思ったより少なかった。1時間以上点灯させて表面温度は、40度以下。なかなか優秀なLEDだった。


シチズンLEDと電源

セードに取り付けた状態

セードに取り付けた状態

放熱フィン

放熱フィン

放熱フィン

放熱フィン

電源ボックス

電源ボックス

完成

完成

謎の SY と41ers

謎の SY と41ers

LED照明製作 No.3 – 放熱板、組み立て、消費電力は?:LED lighting production No.3 – What is the heat sink, assembly, and power consumption?

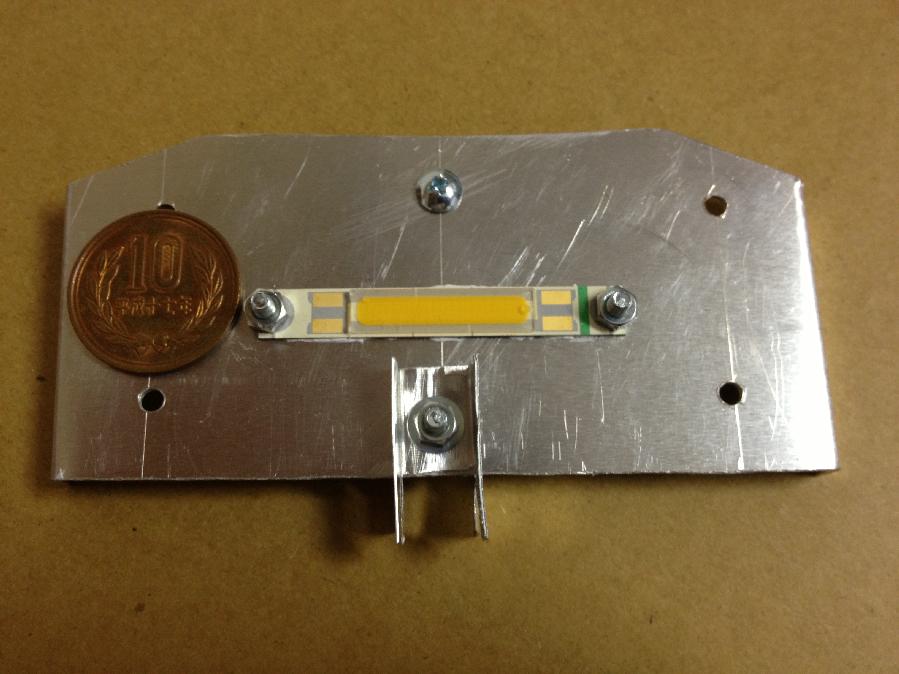
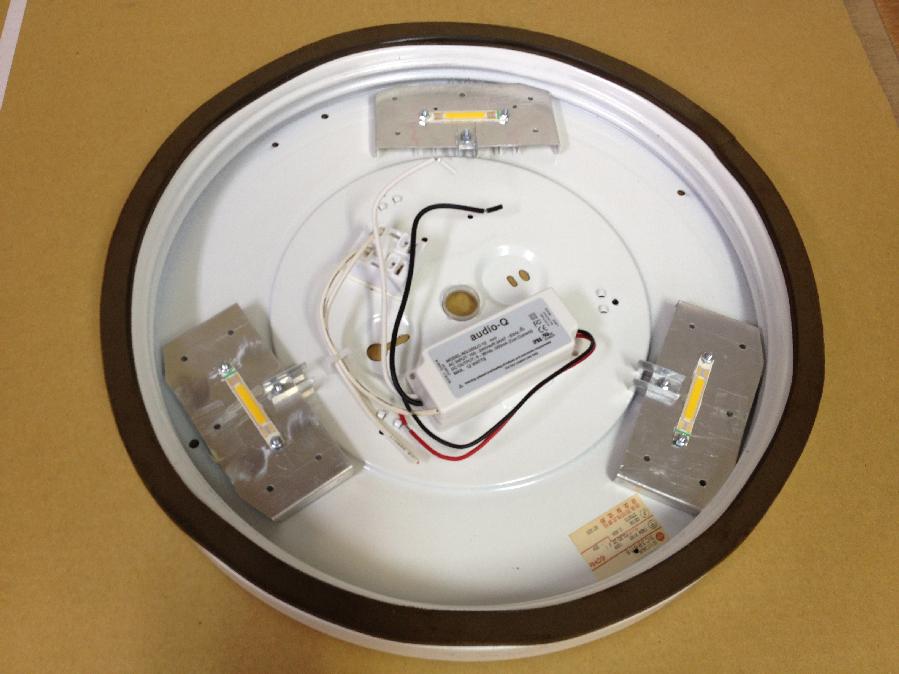
高出力LEDは発熱が大きいので放熱を考慮しないとLEDが壊れたり寿命が短くなったりするので放熱板を取り付ける。

市販の0.3mmのアルミ板を加工して本体へ貼り付ける。この薄さだとはさみで簡単に切り取ることができるし、カッターで傷をつければ折目もきれいにつけることができる。

まず紙で形を作ってそれを台紙にしてアルミ板を切り取っていく。放熱効率を上げるため何箇所もはさみを入れる。

カッターで折り目をつけ折り返して放熱板の出来上がり。これをたくさん本体に貼り付けました。本体にも30mmくらいの穴を5個ほど開けて通風をよくしてさらに放熱効果アップ。

Since high-power LEDs generate a lot of heat, if heat dissipation is not taken into consideration, the LEDs will break or their life will be shortened, so a heat sink is attached.

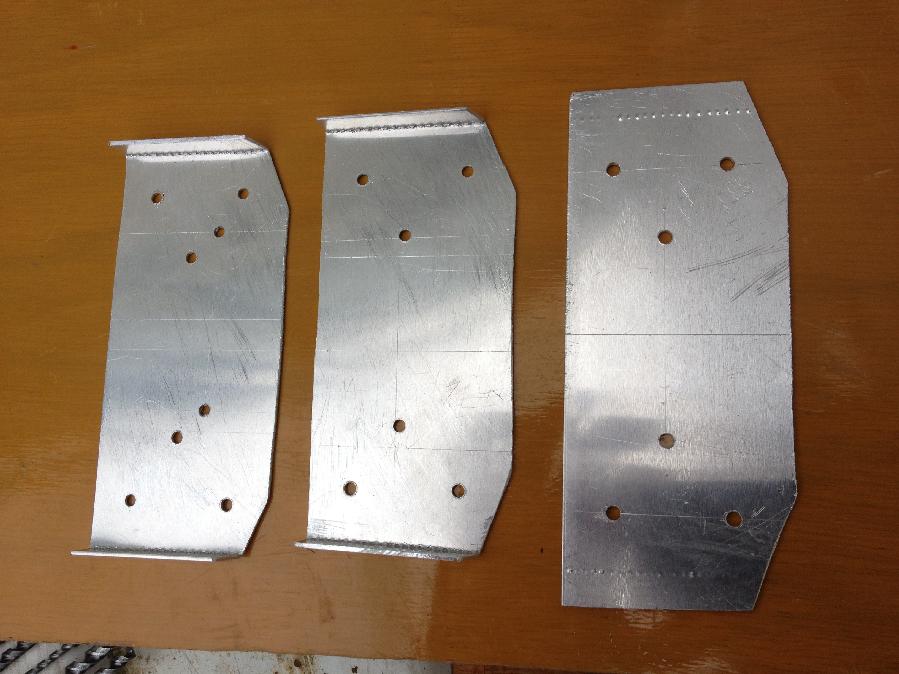
Process a commercially available 0.3 mm aluminum plate and attach it to the main body. With this thinness, you can easily cut it with scissors, and if you scratch it with a cutter, you can make creases cleanly.

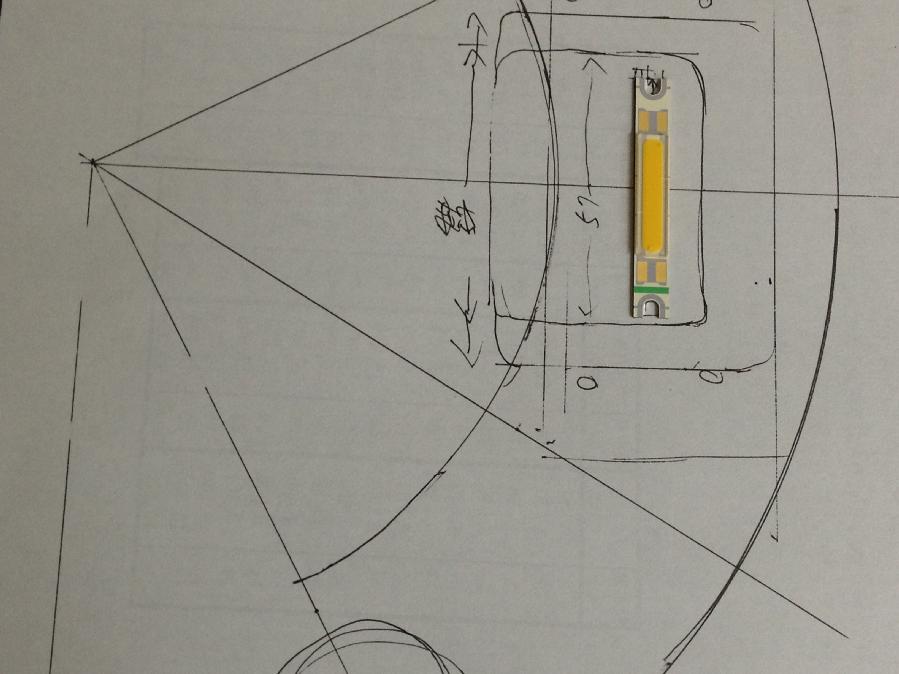
First, make a shape from paper and use it as a mount to cut out the aluminum plate. Insert scissors in multiple places to improve heat dissipation efficiency.

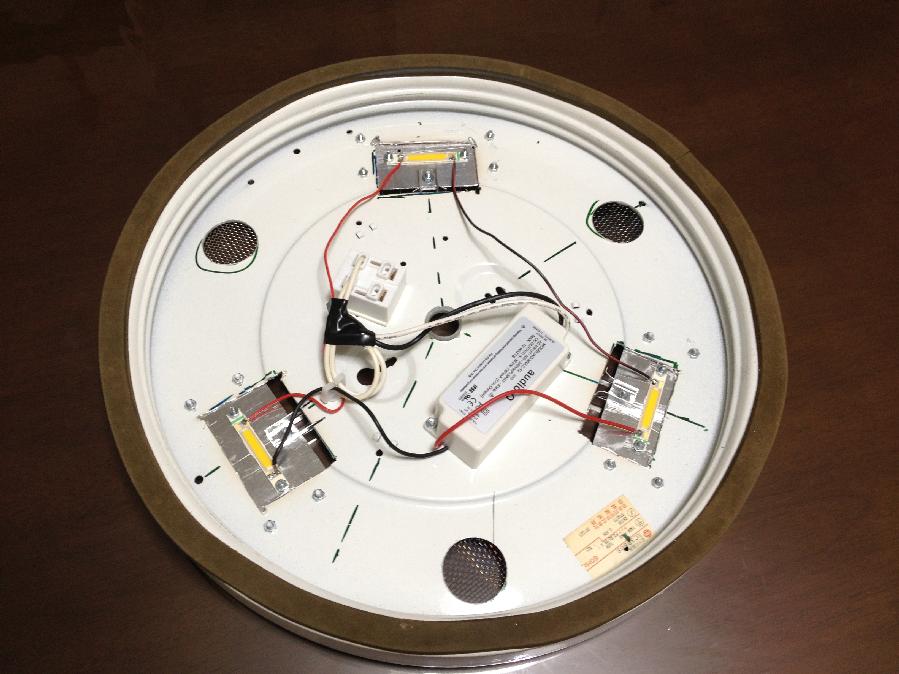
Make a crease with a cutter and fold it back to complete the heat sink. I pasted a lot of this on the main body. Make about 5 holes of about 30 mm in the main body to improve ventilation and further improve the heat dissipation effect.

放熱版

放熱版:Heat sink

放熱版

放熱版:Heat sink

とりあえずこれで完成。ここでストレステスト。長時間の点灯試験を行うことにします。
消費電力の測定と発熱による温度上昇がどの程度あるかを確認するために。

消費電力の測定:これは予想より大きかった。1時間点灯して25W。予想は20Wだったので予想を少しオーバーした。LEDは予定通りの消費電力だが、電源の効率がちょっと悪かったようだ。

温度:LEDを取り付けている器具の鉄板は、51度まで上昇した。これくらいだったら問題ないだろう。

ということで完成です。実際の部屋での使用感を確認しました。

This is the end for the time being. Stress test here. I will do a long lighting test.
To measure power consumption and see how much the temperature rises due to heat generation.

Power consumption measurement: This was greater than expected. It lights up for 1 hour and is 25W. The forecast was 20W, so it was a little over the forecast. The LED consumes power as planned, but the power supply seems to be a little inefficient.

Temperature: The iron plate of the fixture on which the LED is mounted rose to 51 degrees. There should be no problem if it is about this.

That is the end. I confirmed the feeling of use in the actual room.

自作LED照明完成

自作LED照明完成:Self-made LED lighting completed

改造前の照明

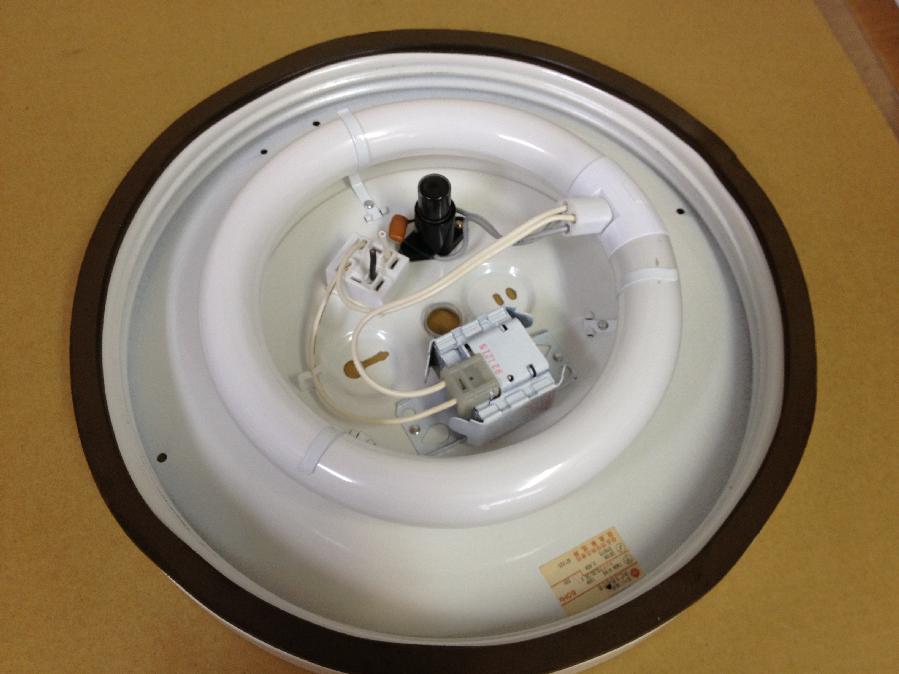
改造前の照明:Lighting before remodeling

まぶしいのでカバーをつけようと思ったがかなり暗くなったのでカバーなしで完成とします。カバーをつけるならLEDの数をもっと多くしないといけない。

明るさは少し暗いくらいでなんら問題ない。本も読めるし楽譜も読める。すばらしい。

長所:照明器具が軽くなる。省エネ。寿命が長い(たぶん)

欠点:少し暗い(LEDを増やせば改善できる)。天井へ光が当たらないので明るさ感がより低い。カバーをつけなかったので影がおかしい。つまり点光源なので何重にも影ができる。高額。1日8時間使ってこの投資額を回収するには約3年半かかる。逆に言えば3年半で元が取れる。
自分の部屋では使用時間が短いので元は取れないでしょう。

It was so dazzling that I thought I would put on a cover, but it got so dark that I completed it without a cover. If you attach a cover, you have to increase the number of LEDs.

The brightness is a little dark and there is no problem. You can read books and scores. great.

Pros: Lighter lighting fixtures. Energy saving. Long life (probably)

Disadvantages: Slightly dark (can be improved by increasing the number of LEDs). Since the ceiling is not exposed to light, the feeling of brightness is lower. The shadow is strange because I didn’t attach the cover. In other words, since it is a point light source, multiple shadows can be created. High price. It takes about three and a half years to recover this investment using eight hours a day. Conversely, it will pay off in three and a half years.
You won’t be able to pay for it because the usage time is short in your room.

影

影:Shadow

影

これからはもっと電気料金が高くなるだろう。他人が取り付けた太陽光発電の余剰分を電力会社が高額で買い取る費用も利用者が負担しないといけないのだから。

98Wが25Wへ約1/4となったのだから店舗の照明をLEDにしたらかなりの節電になる。投資が必要だし店舗なので見栄えもよくなくては、自分の部屋用のように妥協できないので。

ちょっと考えて見ますか。

From now on, electricity prices will be higher. This is because the user must bear the cost of the electric power company purchasing the surplus of the solar power generation installed by another person at a high price.

Since 98W has been reduced to 25W by about 1/4, if the store lighting is changed to LED, it will save a lot of electricity. It requires investment and it’s a store, so if it doesn’t look good, you can’t compromise like it’s for your own room.

Do you want to think about it for a moment?

LED照明製作 No.2 – 部品の取付、配線、テスト点灯:LED lighting production No.2 – Installation of parts, wiring, test lighting

照明器具本体を分解して本体をそのまま利用する。

Disassemble the main body of the lighting equipment and use the main body as it is.

照明本体分解

照明本体分解:Lighting body disassembly

これがインバーター基盤。この中のスイッチだけを再利用するのでそれ以外を切り取ったり配線をはがしたりしてばらばらに分解する。そして電源を取り付ける。

This is the inverter board. Since only the switch in this is reused, the other switches are cut off or the wiring is peeled off to disassemble them separately. Then install the power supply.

電源

電源:Power supply

そして、LEDを取り付ける。放熱を効率よくするためLEDの基盤の裏に放熱用シリコンを塗りシリコンが固まるまでネジで固定。

Then, the LED is attached. To improve heat dissipation efficiency, apply heat dissipation silicon to the back of the LED board and fix it with screws until the silicon hardens.

LED取付

LED取付:LED mounting

配線:外側と内側を別々の電源へ接続する。照明器具にスイッチで全灯→外側のみ点灯→ナツメ球→消灯となるように配線する。
放熱板を取り付ける前にテスト点灯。非常にまぶしい。直接見ないように注意書きがあった。LEDは目によくないのかも。計画通り光の拡散のためのプラスティック板が必要だ。

Wiring: Connect the outside and inside to separate power supplies. Wire the lighting equipment so that all lights → only the outside lights → jujube balls → turn off with a switch.
Test lighting before installing the heat sink. Very dazzling. There was a note not to look directly. LED may not be good for the eyes. As planned, we need a plastic board to diffuse the light.

LED照明全灯

LED照明全灯:All LED lighting

LED照明外側点灯

LED照明外側点灯:LED lighting outside lighting

本体の温度上昇を見ながら10分ほど点灯してみた。確かに発熱ですこしずつ温度が上がってきた。さわれないほどではないが長時間点灯しておくと問題が起きそうなのでテスト終了。

I turned it on for about 10 minutes while watching the temperature rise of the main body. Certainly, the temperature has risen little by little due to fever. It’s not untouchable, but if you leave it on for a long time, problems may occur, so the test is over.

節電のテスト-LED照明を自作 – No.1 計画と部品:Power Saving Test-Make LED Lighting-No.1 Plans and Parts

福島の原発の事故以来、巷では省エネ=節電を皆さん実施されているでしょうか。私は節電はしないつもりでいた。九州では原発の再稼動に向けて動いていたので九州は節電はしなくてもいいかもと思っていたが、国の方向があっち向いたりこっち向いたりでとうとうストレステストをやってかからの稼動となりそうだし、テストの結果次第では、稼動できない原発も出てくるでしょう。

そんなことはあとから考えるとして(ひとりで考えてもどうにもならない)、前から思っていたがこれからの照明は、LEDが主役になるだろうと。そこで以前にも懐中電灯をLED化したことがあるが今度は、部屋の照明を自作しようと思う。

Since the accident at the Fukushima nuclear power plant, have all of you been implementing energy saving = power saving in the streets? I didn’t intend to save electricity. In Kyushu, we were moving toward the restart of the nuclear power plant, so I thought that it would not be necessary to save electricity in Kyushu, but it started after a stress test was finally done depending on the direction of the country. Depending on the test results, some nuclear power plants may not be able to operate.

I thought about that later (it wouldn’t help if I thought about it alone), but I’ve always thought that LEDs will play a leading role in future lighting. So I’ve changed the flashlight to LED before, but this time I’m going to make my own room lighting.

一般に売られているLED電球は、明るさの目安としてルーメンが用いられている。

LED bulbs on the market generally use lumens as a measure of brightness.

一般的に販売されてるT社のLED電球は、565ルーメンで電球40W程度の明るさ、6.9Wの消費電力だが、私の部屋は6畳洋間に72W(40Wと32Wのリング型蛍光管、インバーター式)の照明器具を使っている。これを今回、120ルーメン、1.2WのLED16個で置き換えてみようと部品を発注した。120ルーメン×16個=1920ルーメン。さてどのくらい明るくなるのか、実用になるのか。

The LED bulbs of Company T that are generally sold are 565 lumens, the brightness of the bulb is about 40W, and the power consumption is 6.9W, but my room is 72W (40W and 32W ring type fluorescent tube, 40W and 32W ring type fluorescent tube) I am using an inverter type lighting fixture. This time, I ordered a part to replace it with 16 LEDs of 120 lumens and 1.2W. 120 lumens x 16 = 1920 lumens. How bright will it be and will it be practical?

ちなみに現在の照明器具の消費電力は、計測の結果、98W程度、これを1.2W×16個/変換効率(AC、DC変換のロス)=20W程度の消費電力になる計算だ。あとで実測してみよう。
節電は、98W-20W=78W。1時間当り78Wの節電になる。
自分の部屋は寝るのが主であまり使わないので節電にはあまり貢献しないが、これを店舗で使えば大きな節電になる。そのためのテストも兼ねている。

さて必要な部品は、LED16個、電源、ヒューズ、配線コード、放熱板ほかにとめねじやその他いろいろ。

By the way, the current power consumption of lighting equipment is calculated to be about 98W as a result of measurement, which is 1.2W x 16 pieces / conversion efficiency (loss of AC / DC conversion) = about 20W. Let’s actually measure it later.
Power saving is 98W-20W = 78W. It saves 78W of electricity per hour.
My room is mostly for sleeping and I don’t use it much, so it doesn’t contribute much to power saving, but if I use it in a store, it will save a lot of power. It also serves as a test for that.

The necessary parts are 16 LEDs, power supply, fuse, wiring cord, heat sink, female screw and various other parts.

LED照明部品

LED照明部品:LED lighting parts

LED

LED:LED lighting parts

LEDも発熱します。特に高出力のものはかなり発熱します。そこで放熱をしっかりしないとLEDが壊れます。放熱は市販のアルミ板を加工して本体内に貼り付ける予定。表に出すと見苦しいので隠します。

あとスイッチは、再利用、まぶしさを和らげるためにプラスチックでLEDをカバーします。LEDは点光源となるのでまぶしい、これを和らげるために必要です。

The LED also generates heat. Especially high output ones generate a lot of heat. If you do not dissipate heat properly, the LED will break. For heat dissipation, we plan to process a commercially available aluminum plate and attach it inside the main body. It’s unsightly to put it on the table, so I’ll hide it.

The switch also covers the LED with plastic for reuse and to reduce glare. LEDs are a point light source and are dazzling, which is necessary to alleviate this.

Well production started.

さて製作開始。